Snakemake and Workflow Management
Installation and Running
To install Snakemake, you will first need to have conda installed. Conda is
a package manager that comes with Anaconda, which you should have installed for
the Python workshop. To install Snakemake, simply execute the following command
in a terminal with conda available:
conda install snakemake
For more thorough instructions, you can take a look at the Snakemake documentation
Assuming Snakemake is installed, it can be run by issuing the snakemake command in
a terminal where the working directory contains a file called Snakefile, which
details the workflow for Snakemake to execute.
Analysis as a Directed Acyclic Graph
Traditional bioinformatics analyses often involves many steps across many different files. Files are often large, analysis can be time consuming, and multiple tools will likely be used in order to get from the raw data to final interpretable results. The entire process, starting from raw data and the subsequent analysis steps performed to generate the final produce, is called a workflow or a pipeline. It is often helpful to break a workflow into single steps, where the output from one step is used an input to another. In this way, we can model a workflow as a directed acyclic graph (DAG).
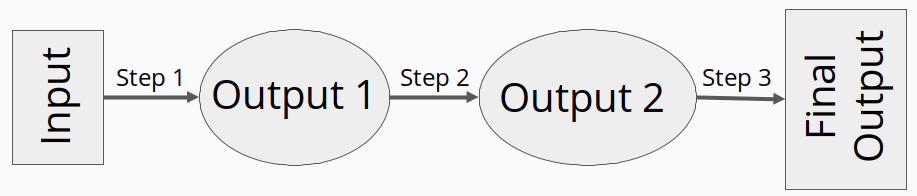
By modeling a workflow as a DAG, identifying dependencies and necessary orders of
executions is relatively simple. This is is where workflow managers, such as Snakemake, come in. At
a high level, workflow managers have been developed to execute the workflow DAG
in order. Theoretically, it would be possible to oversee such execution yourself,
or perhaps you could even get a little fancy and write a bash script to run
each step. However, workflow managers provide several benefits:
Perform the same task across many files without writing extra code.
Track sucessful execution of each task to easily allow start-up from failure.
Centralize description of analysis workflow to single file.
Produce integrated reports for each step.
Re-run entire pipelines for new data or new parameters with minimal changes.
Many other niceties such as cluster integration,
While there are many workflow/pipeline management tools around, such as Nextflow, Luigi, and many others, we will be using Snakemake.
Snakemake
Introduction
Snakemake is a python-based workflow/pipeline management tool. It’s based on GNU Make and follows a file-based production rule implementation. That is, a rule is an operation that takes an input one file, and operates onto it to produce another file.
In the above example, we created a rule called copy_file that copies one file
to another location. The input file(s) is specified by the input block, the
expected output file(s) to produce is denoted by the output block, and the
operations to generate the output file are implemented by the shell block.
Input and output file names are passed to the shell command using curly brackets {},
as shown above.
A More Thorough Example
To go over the general structure of rules and how to string them together, we will look at an example pipeline from the Snakemake documentation. This example workflow will go through some example steps to perform variant calling
You are encouraged to read over the general structure and syntax of snakemake here, before following the linked tutorial for a more interactive introduction.
The raw data, target output, and required analysis steps for this pipeline can be broken down as:
Starting Data - Short read sequences in fastq format - Publicly available genome fasta file
Target Output - VCF file of found variants
Required Steps - Map reads to genome - Sort and index mapped reads - Call variants
To begin, we create a rule to generate a genomic index (required for alignment).
rule index:
    input:
        "data/genome.fa"
    output:
        "data/genom_index"
    shell:
        "bwa index -p genome_index {input}"
Here we have created the rule index that takes the input file data/genome.fa
(assumed to exist) and creates the data/genome_index file by calling bwa index
(bwa is an alignment tool).
Once the index has been created, we can now map our fastq files to the genome,
also using bwa. Such a rule would look like this:
rule bwa_map:
    input:
        index="data/genome_index"
        fq="data/samples/A.fastq"
    output:
        "mapped_reads/A.bam"
    shell:
        "bwa mem {input.index} {input.fq} | samtools view -Sb -> {output}"
The above rule introduces the possibility of working with multiple input/output
files. These files can be specified using key words (i.e. “index” and “fq”). Individual
files can then be accessed individually using . accessors as shown above.
Because the above file uses “data/genome_index” as input, and because our previous
rule index generates the “data/genome_index” file, Snakemake will know index
must be executed before bwa_map.
While the bwa_map map successfully aligns reads to generate alignments,
however, as written we would need to write a separate bwa_map rule for each
fastq file we have. To get around this, we use wildcards wildcards are automatically
detected by snakemake using existing file names. For this example, assume we have two
fastq files “data/samples/A.fastq” and “data/samples/B.fastq”. To modify bwa_map
recognize it should align both fastq files, we again use curly brackets {} to mark
wildcard regions in filenames:
rule bwa_map:
    input:
        index="data/genome_index"
        fq="data/samples/{sample}.fastq"
    output:
        "mapped_reads/{sample}.bam"
    shell:
        "bwa mem {input.index} {input.fq} | samtools view -Sb -> {output}"
As written, snakemake will automatically detect that bwa_map should be run for
both fastq files.
Before calling variants, we must first sort the our newly created alignment files.
To do so, we create the rule samtools_sort.
rule samtools_sort:
    input:
        "mapped_reads/{sample}.bam"
    output:
        bam="sorted_reads/{sample}.bam"
        bai="sorted_reads/{sample}.bam.bai"
    shell:
        "samtools sort -T sorted_reads/{wildcards.sample} "
        "-O bam {input.bam} > {output};"
        "samtools index {output}"
Because the above rule makes use the sample wildcard, snakemake will again
know it will need to execute the rule for each .bam file produced by bwa_map.
As shown in the shell block, you are able to explicity reference wildcards for each
run as shown by {wildcards.sample}. Now that we have sorted alignments, we
can peform the final step of the pipeline and call variants using bcftools.
SAMPLES = ["A", "B"]
rule bcftools_call:
    input:
        fa="data/genome.fa",
        bam=expand("sorted_reads/{sample}.bam",
                sample=SAMPLES),
        bai=expand("sorted_reads/{sample}.bam.bai},
                sample=SAMPLES)
    output:
        "calls/all.vcf"
    shell:
        "samtools mpileup -g -f {input.fa} {input.bam} "
        "| bcftools call -mv -> {output}"
Above, the rule bcftools_call uses the expand function from snakemake to
to aggregate inputs accross wildcards. In this specific case bam and bai
input “files” are actually two separate lists of files containing generated bam
and bam.bai files for both “A” and “B” samples. An important note, is that
expand functions in Snakemake are often required in order to for Snakemake
to recognize allowable wildcard values.
Finally, we we can put the entire pipeline together in a single Snakefile,
while also specifying an all rule which tells Snakemake which file should be
the default target.
SAMPLES = ["A", "B"]
rule all:
    "calls/all.vcf"

rule index:
    input:
        "data/genome.fa"
    output:
        "data/genom_index"
    shell:
        "bwa index -p genome_index {input}"

rule bwa_map:
    input:
        index="data/genome_index"
        fq="data/samples/{sample}.fastq"
    output:
        "mapped_reads/{sample}.bam"
    shell:
        "bwa mem {input.index} {input.fq} | samtools view -Sb -> {output}"

rule samtools_sort:
    input:
        "mapped_reads/{sample}.bam"
    output:
        bam="sorted_reads/{sample}.bam"
        bai="sorted_reads/{sample}.bam.bai"
    shell:
        "samtools sort -T sorted_reads/{wildcards.sample} "
        "-O bam {input.bam} > {output};"
        "samtools index {output}"

rule bcftools_call:
    input:
        fa="data/genome.fa",
        bam=expand("sorted_reads/{sample}.bam",
                sample=SAMPLES),
        bai=expand("sorted_reads/{sample}.bam.bai},
                sample=SAMPLES)
    output:
        "calls/all.vcf"
    shell:
        "samtools mpileup -g -f {input.fa} {input.bam} "
        "| bcftools call -mv -> {output}"
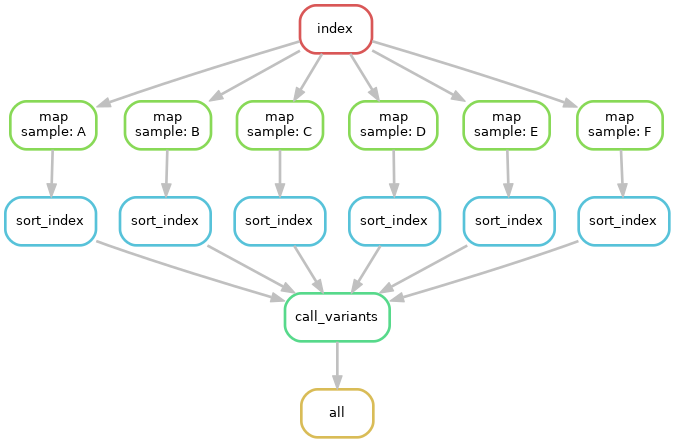
Using network diagrams, we can visualze the above workflow as a simple DAG:
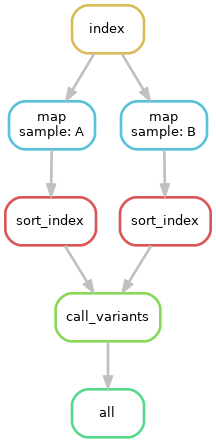
The above image shows not only the dependence of rules on other rules, but also
the execution order of each step. Without changing the pipeline as written, but
instead expanding the samples wildcard to include more samples, we can easily
run the pipeline for an arbitrary number of samples.
Using Python and R with Snakemake
In the above example, through the shell block, we only used rules that could execute their necessary
commands via bash. A shell block is nice if you are working with command-line tools,
however, we will often want to perform analysis either in R or Python
scripts. Snakemake is able to handle passing input and parameters to both R
and Python scripts using a script block. Assuming a Python script
copy.py that copies one file to another, our basic copy rule could be replaced
with:
input:
    txt="test.txt"
output:
    txt="test_copy.txt"
script:
    "copy.py"
where copy.py might be implemented as:
import shutil
if __name__ == '__main__':
    try:
        snakemake
    except NameError:
        snakemake = None
    if snakemake is not None:
        shutil.copy(snakemake.input['txt'], snakemake.output['txt'])
Meanwhile, Snakemake parameters passed to an R script using the @ operator
(e.g. snakemake@input[['txt]] and snakemake@output[['txt']])
Rule Parameters, Configuration Files, Input Functions, Oh My!
Often we will want to pass parameters to each rule, set configuration files for each run of data, and might require some more sophisticated specifications for our input files. Now that you’ve been introduced to the basic motivation, syntax, and structure behind Snakemake, you should follow along interactively with the tutorial as described on the Snakemake website. Because we will need to run our own pipeline during the workshop, it is suggested to implement + run the pipeline on either your local computer, or on the scc – whichever you’ll be using during the actual workshop. By the end of the tutorial, you should know the basics for writing and running Snakemake pipelines. If you complete up until te “Additional Features” step, you should have enough knowledge to complete the upcoming workshop.